Preview Images
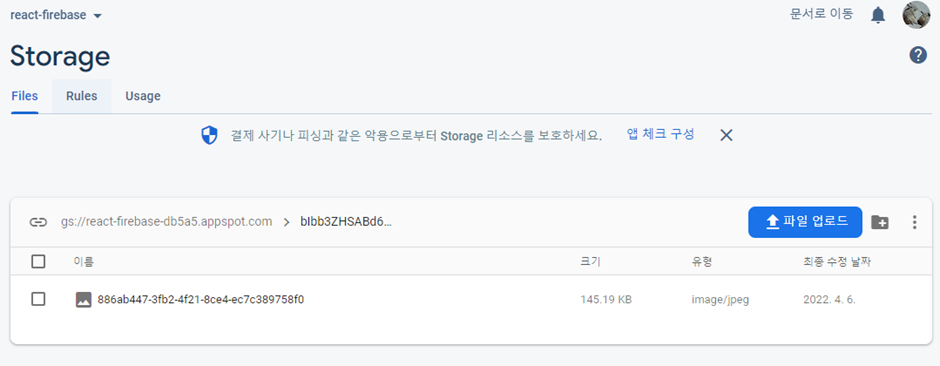
파일 저장을 위해 Firebase 콘솔에서 Storage를 활성화시켜주자

글에 이미지를 함께 올릴 때, FileReader API로 이미지 미리보기를 구현해보자
[src/routes/Home.js]
...
  const onFileChange = (event) => {
    const {
      target: { files },
    } = event;
    const theFile = files[0];
    const reader = new FileReader();
    // 파일이 읽어지면 실행
    reader.onloadend = (finishedEvent) => {
      console.log(finishedEvent);
    };
    reader.readAsDataURL(theFile); // 파일을 읽기 시작
  };
...
<input type="file" accept="image/*" onChange={onFileChange} />
...
input 태그의 file은 event.target.files에 배열로 담기는데,
FileReader로 해당하는 파일을 읽어 reader 변수에 담고 콘솔에 찍어보자
* input 태그의 accept 속성으로 파일의 타입을 명시

...
const [attachment, setAttachment] = useState();
...
  const onFileChange = (event) => {
    const {
      target: { files },
    } = event;
    const theFile = files[0];
    const reader = new FileReader();
    // 파일이 읽어지면 실행
    reader.onloadend = (finishedEvent) => {
      const {
        currentTarget: { result },
      } = finishedEvent;
      setAttachment(result);
    };
    reader.readAsDataURL(theFile); // 파일을 읽기 시작
  };
  const onClearAttachment = () => setAttachment(null);
...
        <input type="file" accept="image/*" onChange={onFileChange} />
        <input type="submit" value="Post" />
        {attachment && (
          <div>
            <img src={attachment} alt="preview" width="50px" height="50px" />
            <button onClick={onClearAttachment}>Clear</button>
          </div>
        )}
      </form>
...
url을 state 데이터에 담아 img 태그에 넣어 미리보기를 구현했다
Uploading
Firebase Cloud Storage 문서🔽
웹에서 Cloud Storage 시작하기 | Firebase Documentation
Join Firebase at Google I/O online May 11-12, 2022. Register now 의견 보내기 웹에서 Cloud Storage 시작하기 Firebase용 Cloud Storage를 사용하면 이미지와 동영상 등 사용자 제작 콘텐츠를 업로드 및 공유하여 앱에 리
firebase.google.com
rules_version = '2';
service firebase.storage {
  match /b/{bucket}/o {
    match /{allPaths=**} {
      allow read, write: if request.auth != null;
    }
  }
}
Storage의 Rules가 위와 다르다면 수정해주자
[src/fbase.js]
export const storageService = firebase.storage();storage를 추가해준다
npm install uuid식별자를 랜덤으로 생성하는 라이브러리인 uuid 패키지를 설치해준다
[src/routes/Home.js]
import { v4 as uuidv4 } from "uuid";
import { dbService, storageService } from "fbase";
...
  const onSubmit = async (event) => {
    event.preventDefault();
    const fileRef = storageService
      .ref()
      .child(`${props.userObj.uid}/${uuidv4()}`);
    const response = await fileRef.putString(attachment, "data_url");
    console.log(response);
    /* await dbService.collection("posts").add({
      text: post,
      createdAt: Date.now(),
      creatorId: props.userObj.uid,
    });
    setPost(""); */
};- uuid를 활용해 Storage에 현재 사용자의 uid 이름의 폴더에 파일을 넣는 구조로 식별자 생성
- fileRef에 이미지 url (attachment), 데이터 형식을 putString으로 넣어 파일 저장

File URL and Post
[src/routes/Home.js]
...
  const onSubmit = async (event) => {
    event.preventDefault();
    let attachmentUrl = "";
    if (attachment !== null) {
      const attachmentRef = storageService
        .ref()
        .child(`${props.userObj.uid}/${uuidv4()}`);
      const response = await attachmentRef.putString(attachment, "data_url");
      attachmentUrl = await response.ref.getDownloadURL();
    }
    const postObj = {
      text: post,
      createdAt: Date.now(),
      creatorId: props.userObj.uid,
      attachmentUrl,
    };
    await dbService.collection("posts").add(postObj);
    setPost("");
    setAttachment(null);
  };
...getDownloadUrl은 Storage에 올라간 이미지를 확인할 수 있는 url을 반환,
해당 url을 post 객체에 추가해 글에 Storage 이미지 정보를 추가해준다
* if문으로 사진 없이 글만 올리는 경우 예외처리
[src/components/Post.js]
...
          <h4>{props.postObj.text}</h4>
          {props.postObj.attachmentUrl && (
            <img
              src={props.postObj.attachmentUrl}
              alt="postImage"
              width="50px"
              height="50px"
            />
          )}
...
img 태그에 post 객체의 url을 넣어 렌더링해준다!
Deleting Files
[src/components/Post.js]
...
  const onDeleteClick = async () => {
    const ok = window.confirm("정말 삭제할까용?");
    if (ok) {
      await dbService.doc(`posts/${props.postObj.id}`).delete();
      await storageService.refFromURL(props.postObj.attachmentUrl).delete();
    }
};
...
refFromURL 메서드로 FireStore의 url을 역으로 참조해 Storage의 이미지도 함께 삭제한다!
본 내용은 노마드코더의 '트위터 클론코딩'을 바탕으로 작성되었습니다.
'Back-end > Firebase' 카테고리의 다른 글
| [노마드코더] #6 Finishing Up (0) | 2022.04.10 |
|---|---|
| [노마드코더] #5 Edit Profile (0) | 2022.04.08 |
| [노마드코더] #3 CRUD (0) | 2022.03.28 |
| [노마드코더] #2 Authentication (0) | 2022.03.18 |
| [노마드코더] #1 Introduction (0) | 2022.03.11 |